Develop a connector
After you add a connector to your integration, you need to develop the connector to work with your data source type.
This document provides information on the steps to develop your connector and the options available for each. We recommend that you start by reviewing the workflow.
For details on the APIs you need to define for your connector and examples of how to use them, refer to the NetlifyConnector API reference documentation.
Workflow
When you develop the connector for your integration, you need to:
- Define your data model
- Define document models for your connector
- As needed, define object, union, and enum models to use as field types on your document models
- Specify how your connector should insert and update documents when syncing to Netlify Connect
- Define the configuration options that should appear in the Netlify UI when Netlify Connect users use your data integration
- (Optional) Customize the integration’s enablement flow
Definitions
As you develop a connector, it might be helpful to review the following key terms:
- Data integration: an integration built with the Netlify SDK that contains a Connectors component.
- Data source: an external system or service that contains data, such as a content management system (CMS).
- Data layer: in Netlify Connect, a data layer contains a real-time graph database with data synced from one or more data sources, and a GraphQL API to access that data. Netlify uses data integrations to connect to data sources and sync data.
- Document model: a representation of the data that makes up an individual entity or document in your data source, such as a
PostorUser. Each document model includes various fields and each field has a type that references another defined model — such as a scalar, object, or union model. - GraphQL schema: defines the structure and data types that users can query using a data layer’s GraphQL API. Netlify generates the schema using the data model that your connector defines.
- Relationship field: a field that has another document model as its type. It allows you to link from one document to another document by document ID. For example, you may have an
authorsfield on thePostdocument model that is a list ofUserdocuments. - Cache field: specified in your data model and used by Netlify to determine when to update data in Netlify Connect. Documents are only updated when the value of the cache field changes. Allows for GraphQL query caching.
Define your data model
Your connector must specify the shape of the data stored in your data source type by defining a data model using model(). Model definitions are used by Netlify to build a GraphQL schema for your data source, which includes the types and relationships of your data.
The data model should include document models for each type of record stored in your database, and the fields and types stored on each one. The following sections outline the properties available for document models and their fields.
Need access to data in real time? Or need data from another API or database?
The following documentation outlines how to build a static connector, which syncs data from a data source and stores it in the Connect database. If you need to build a connector that requires access to data in real time, you may want to build a dynamic connector instead.
Define document models
You can think of a document as a single unit of information from your data source, such as a post, article, user, product, etc. For each type of information in your data model, you need to define a document model that describes the shape of that data. To define a document model, use define.document().
It’s important to define anything that you want to store, uniquely identify, and query later in a list or by ID as a document model.
A document model includes the following properties:
id: defined by default, this is the unique ID within your document model type. You don’t need to define anidproperty manually in your model, but you will need to set the value when you sync documents.name: a string representing the name of the document model. For example,PostorUser.cacheFieldName: (optional) the field to use for caching each document.fields: an object containing each of the document model’s fields. Each field is an object that includes atypeand can optionally includerequiredandlistproperties. Learn more about field types.
For example, this is how to define a document model called Post that has a title field and a required updatedAt field. The updatedAt field is used for caching. Note that an id isn’t explicitly defined here because Netlify includes one automatically.
connector.model(async ({ define }) => { define.document({ name: "Post", cacheFieldName: "updatedAt", fields: { title: { type: "String", }, updatedAt: { type: "String", required: true, }, }, });});The following sections outline the different properties available to you when you define your model. We’ve also included a detailed example that you can refer to.
Cache field name
To allow Netlify to optimize GraphQL queries for your users, we recommend using cache fields. Netlify uses cache fields to determine what data to re-insert into the data layer database in Netlify Connect and to allow for GraphQL query caching.
If you don’t set a cache field, Netlify will recreate documents of that type every time models.[ModelName].insert() is called.
When defining a document model, you can specify a top-level model field to use for caching each document.
For example:
connector.model(async ({ define }) => {  define.document({    name: "Post",    cacheFieldName: "updatedAt",    fields: {      title: {        type: "String",      },      updatedAt: {        type: "String",        required: true      },    },  });});
connector.sync(({ models }) => {    models.Post.insert({      id: "1",      title: "Hello world"      updatedAt: "1689021849725"    })})
In this example, cacheFieldName is set to the updatedAt field. The Post document will only update if the updatedAt value has changed since the last time models.Post.insert() was called with the same document ID.
Fields
When you define fields for a document model or an object type, you can set the following properties:
- field name: defined using the object property name for that field. You can use any field name except for
internal,id, andfields. For example, this is how we would set the field nameupdatedAt:fields: {updatedAt: {type: "String",required: true,},} type: defines the type of the field. Learn more about field types.required: (optional) set totrueto mark a field as required.list: (optional) set totrueto indicate the field is a list. To make the list required, set this property torequiredinstead oftrue. For example,list: required.
Field types
The fields on your document model or object type can use the following as a type:
- built-in scalars:
String,Int,Float,Boolean,JSON, andDate. - mapped built-in scalars:
string(mapped toString),integer(Int),number(Float),boolean(Boolean),json(JSON),date(Date). - an object type: an object type that you’ve defined.
- an enum type: an enum type that you’ve defined.
- a union type: a union type that you’ve defined.
- a document model: another document model you’ve defined. Setting a document model as the type of a field automatically makes that field a relationship field.
If you have a type that is only used once, you can define it inline within another field definition. This can be convenient when automatically generating models and types.
Define an object type
If you have a complex field type on your documents, you can define an object type using define.object(). You define the fields on your object the same way you do on a document model, as documented under fields.
Note that object types don’t have insert and delete methods, only document models do.
Once you have defined an object and stored it in a variable, you can use that object type on your document model.
For example:
connector.model(async ({ define }) => {  // this defines an object type that we store in a variable  // called Content  const Content = define.object({    name: "Content",    fields: {      title: {        type: "String",      },    },  });
  // this defines a document model `Post` and its `content` field is  // of the `Content` object type defined above  define.document({    name: "Post",    fields: {      title: {        type: "String",        required: true,      },      content: {        type: Content,      },    },  });});
For unnamed object types, you can also define the models inline using define.inlineObject().
Define an enum type
Enumerated (enum) types are a specific set of strings that you can query or use in filters in a data layer’s GraphQL API. You can define an enum using define.enum().
For example:
connector.model(async ({ define }) => { define.enum({ name: "ExampleEnumStoplight", values: [ { label: "Green light", // used as the GraphQL description value: "GREEN" // the actual enum member value }, { label: "Yellow light", value: "YELLOW" }, { label: "Red light", value: "RED" }, ] })})For unnamed enum types, you can also define the models inline using define.inlineEnum().
Define a union type
Union types are combined types that include different object types and/or different document models. You define a union type using define.union().
For example:
const Content = define.union({  name: "ExampleContentUnion",  types: ["Post", "News"]})
connector.model(async ({ define }) => {  const UserModel = define.document({    name: "User",    fields: {      posts: {        type: Content,        list: true      },      mostPopularPost: {        type: Content      }    }  })
  define.document({    name: "News"    fields: {      title: {        type: "String"      }    }  })
  define.document({    name: "Post",    fields: {      author: {        type: UserModel      }    }  })})
If relationship fields are union types, they are required to have the ID and type of the relationship when you insert documents. Learn more about creating documents that have relationship fields.
For unnamed union types, you can also define the models inline using define.inlineUnion().
Inline model definitions
For situations where your type is unnamed in your data source, you may want to define objects, unions, or enums without a name. For example, when a CMS supports non-global type definitions.
To support this, there are inline definition helpers for each of these types:
define.inlineObject()define.inlineUnion()define.inlineEnum()
For example:
connector.model(async ({ define }) => { define.document({ name: "Post", fields: { content: { type: define.inlineUnion({ types: ["Post", "News"] }) } } })})The inline model definitions will still have globally unique names that use the hash of the model definition itself.
So, while non-inline definitions will error if you define them with a duplicate name, you may re-define inline model definitions as many times as you’d like. Since the model name is a hash of the definition, we can share the same model definition in all the places it was re-defined.
Relationship fields
Relationship fields are a type of field that allows you to link from one document to another document by document ID. To create a relationship field, set the type of the field to a reference to a document model definition variable, or to the name of a document model.
Learn more about creating documents that have relationship fields.
Example document model definition
This detailed example demonstrates how to define a document model and the various types of fields on it. Except for cacheFieldName, the same options are available to object types.
connector.model(async ({ define }) => {  define.document({    name: "Post", // name of the document model    cacheFieldName: "updatedAt", // cache fields only apply to document models    fields: {      updatedAt: { // updatedAt is the field name        type: "String",        required: true, // this is a required field.      },      title: {        type: "String",      },      postContent: {        type: Content, // this object type, `Content`, is defined below      },      author: {        type: "User", // this is a relationship field because `User` is a document model, defined below        list: true,      }      categories: {        type: "String",        list: true, // Post.categories is a list of strings      },      languages: {        type: "String",        list: required,        // In this example all Post documents must include a languages list but the list can be empty.        // for example, models.Post.insert({languages: []})      },      tags: {        type: "String",        required: true,        list: required,        // In this example all Post documents must include a list of tags and the list must include values.      },    },  });
  // defines a Content object type  const Content = define.object({    name: "Content",    fields: {      title: {        type: "String",      },    }  });
  // defines a User document model  define.document({    name: "User",    fields: {      name: {        type: "String",      },    }  });});
Specify how to insert and update data
Your connector must include details on how Netlify should insert documents using data from an instance of your data source type and how to process updates whenever the data changes.
Sync documents
When your connector first runs in a data layer, Netlify calls the connector.sync() API to perform an initial sync from your data source.
The API has access to a models object. This object contains each document model you defined with define.document(), where the keys are the document model names and the values are the insert and delete APIs for that model. For example, if you defined a Post document model, you can use models.Post.insert() and models.Post.delete().
As you configure the actions Netlify should take on initial sync, note the following:
- All documents must have a unique
id. Make sure to pass anidvalue for each document when you callinsert(). We recommend that you use the ID defined in your CMS or data source. Even if the data source ID isn’t globally unique, Netlify makes it globally unique using a combination of your connector instance ID, the document model name, and the document’s ID from your data source. For example,[connector-id]-[model-name]-[document.id]. - All relationship fields must contain the raw document ID. Similar to
idvalues, all relationship fields should contain the raw document ID from your data source. Netlify will make the ID globally unique and use it to make the relationship to the correct document type you defined. Learn more about adding documents that have relationship fields. - The
insertmodel action is an upsert. As a result, callinginsertmultiple times on objects that contain the sameidwill update the same stored document. You can use thecachehelper to work around this. - Connect to any data source in this API. Any data source will work, including JSON APIs, GraphQL APIs, and local files such as
.csvor Excel files. - Consider storing cache-related metadata. The
connector.sync()API has access to thecachehelper, which you can use to store sync-related metadata to help with caching on subsequent syncs. For example you can store a CMS sync token or a timestamp containing the moment your last sync finished.
For example:
const data = {  Post: [    {      id: "Post-1",      description: "Hello world!",      authorId: "Author-1",      updatedAt: "2020-01-01T00:00:00.000Z",    },    {      id: "Post-2",      description: "Second post!",      authorId: "Author-2",      updatedAt: "2020-01-01T00:00:00.000Z",    },    {      id: "Post-3",      description: "Third post!",      authorId: "Author-2",      updatedAt: "2020-01-01T00:00:00.000Z",    },  ],  Author: [    {      id: "Author-1",      name: "Jane",      updatedAt: "2020-01-01T00:00:00.000Z",    },    {      id: "Author-2",      name: "Marta",      updatedAt: "2020-01-01T00:00:00.000Z",    },  ],};
connector.sync(async ({ models, isInitialSync }, configOptions) => {  if (!isInitialSync) return // this example only shows initial syncing logic
  for (const model of models) {    // for each model, insert documents from the array of data for that model type    const cmsData = data[model.name] // note: this would usually be an API call to a CMS    model.insert(cmsData);  }
  /* For example, the first data item would be inserted as follows. Note  that Netlify will add extra characters to make the id globally  unique on insertion:
    models.Post.insert({      id: "Post-1", // internally will be converted to a uuid      _objectId: "Post-1", // this will stay as the original ID.      title: "Hello world!",    });
  */});
Add documents that have relationship fields
To insert a document that contains a relationship field, use the raw document ID from your data source. As long as you provide the ID from your data source Netlify will figure out how to make the relationship between the document types you’ve defined.
For example:
connector.model(async ({ define }) => {  const UserModel = define.document({    name: "User",    fields: {      posts: {        // relationship field from a User document to a list of Post documents        type: "Post",        list: true,      },    },  });
  define.document({    name: "Post",    fields: {      author: {        user: {          type: UserModel,        },      },    },  });});
connector.sync(async ({ models, isInitialSync }) => {  if (!isInitialSync) return // this example only shows an initial data sync
  models.User.insert({    id: "1",    posts: ["1"],    // `posts` was defined as a list field, so an array is required.    // Notice "1" is the "raw id" of a Post. Netlify will insert    // a globally unique ID from this that matches the ID of the Post    // inserted with the ID "1".  });  models.Post.insert({    id: "1",    author: "1",    // This `author` relationship field isn’t required for User.posts to    // work. For now, the only way to do back-references is to    // explicitly set the ID on each connected document. Each relationship    // field is a one-way relationship from one document to another.  });});
If relationship fields are union types, they are required to have the ID and type of the relationship. For example:
const Content = define.union({  types: ["Post", "News"]})
connector.model(async ({ define }) => {  const UserModel = define.document({    name: "User",    fields: {      posts: {        type: Content,        list: true      },      mostPopularPost: {        type: Content      }    }  })
  define.document({    name: "News"    fields: {      title: {        type: "String"      }    }  })
  define.document({    name: "Post",    fields: {      author: {        user: {          type: UserModel        }      }    }  })})
connector.sync(async ({ models, isInitialSync }) => {  if (!isInitialSync) return // this example only shows an initial data sync
  models.User.insert({    id: "1",    posts: [      {        __typename: "Post",        id: "1"      },      {        __typename: "News",        id: "2"      }    ],    mostPopularPost: {      __typename: "News",      id: "2"    }  });  models.Post.insert({    id: "1",    author: "1"  });  models.News.insert({    id: "2",    title: "Hello world"  });});
In this example, since posts can be either a News or Post document model, a __typename field is required. Netlify will use this field to identify the type of document in the union field.
Update documents
After the initial sync, Netlify calls the connector.sync() API again for all subsequent syncs.
We recommend that you support data caching by only updating documents that have changed since the last sync. But, this may not be possible for some data sources, such as file-based data sources.
The following sections outline how to cache data when data updates, how to use the cache helper to manage sync-related metadata, and how to configure your connector if it does not cache data.
If you can cache data
To support data caching and only update documents that have changed, use the connector.sync() API to only update data when the isInitialSync argument is false.
All previously existing documents inserted during connector.sync() will continue to exist unless you modify them (by re-inserting them) or delete them during connector.sync(). The previously existing documents that you don’t modify are cached between data syncs.
The API has access to a models object. This object contains each document model you defined with define.document(), where the keys are the document model names and the values are the insert and delete APIs for that model. For example, if you defined an Author document model, you can use models.Author.insert() and models.Author.delete().
Code example:
const changedData = {  Post: [    {      id: "Post-1",      description: "Hello world again!",      authorId: "Author-1",      updatedAt: "2020-01-01T00:00:00.001Z",    },  ],};
const deletedData = {  User: ["1"],};
connector.sync(async ({ models, isInitialSync }, configOptions) => {  if (isInitialSync) return // this example only shows a data update, not an initial sync
  // handle updates  for (const model of models) {    model.insert(changedData[model.name]);  }
  // and deletes  for (const model of models) {    model.delete(deletedData[model.name]);  }});
Store cache-related metadata
When you insert and update documents, you can use the cache helper to store and access non-document data about your data sources. For example, you may want to reference a sync token or last updated timestamp from your CMS.
The cache helper is a key/value store that is available as an argument in each connector’s lifecycle, and provides two methods:
set: pass in a key and value to store or updateget: pass in a key to retrieve the stored value
For example:
const fetchCMSData = ({ since }) => {  /* ... */};
const makeNodesFromData = ({ cmsData, models }) => {  for (const model of models) {    model.insert(cmsData[model.name]);  }};
connector.sync(async ({ models, cache, isInitialSync }) => {  if (isInitialSync) {    // On initial sync, pass in a lastSync value of null to get all data    const cmsData = await fetchCMSData({ since: null });
    makeNodesFromData({      models,      cmsData,    });  } else if (!isInitialSync) {    // On subsequent syncs, access the lastSync value we stored    const lastSyncTime = await cache.get("lastSync");
    // Fetch data that changed since the last time we ran a sync    const cmsData = await fetchCMSData({      since: lastSyncTime,    });
    makeNodesFromData({      models,      cmsData,    });  }
  // As a final step, we update the lastSync value to now  await cache.set("lastSync", Date.now());});
If you can’t cache data
If your connector does not support caching, you must explicitly indicate this by setting supports.deltaSync to false in the call to addConnector().
For example:
integration.addConnector({ supports: { deltaSync: false }})When supports.deltaSync is set to false, isInitialSync is false on every data sync and stale document deletion is enabled.
As a result, every time data syncs and connector.sync(fn) runs, your connector needs to re-insert all relevant documents. Any documents that aren’t re-inserted will be automatically deleted.
Normalize model field data
Sometimes the data in your data source doesn’t match the exact data shape defined in your models. You can normalize the data before it’s stored in Connect by implementing a visitor function for your document, object, enum, and union definitions as well as for any field definition.
connector.model(async ({define}) => {  define.document({    name: `ExampleDocument`,    visitor: (document, info) => {      // if the hasTitle field was defined as a boolean      if (info.fields.hasTitle?.typeName === `Boolean`) {        // set the hasTitle field as a boolean        document.hasTitle = !!document.title      }
      return document    },    fields: {      title: {        type: `String`,        visitor: (title, info) => {          // info about the field type can be inspected using the second argument.          // this is mostly useful when you're dynamically building your schema and          // visitor functions          // check the TS types for `info` in your IDE to see available fields          //          // In this example we just add some text to the end of every title, for illustration.          return title += ` testing visitors`
          // You could also use this to change the data structure,          // for example by returning `title.value` if your title was an object          // where the string value of the title was nested on a `.value` property.          return title.value        }      },      exampleObjectField: {        type: define.object({          name: `ExampleObject`,          visitor: (object) => {            object.subtitle += ` testing nested visitor`            return object          },          fields: {            subtitle: {              type: `String`            }          }        })      }    }  })})
In this example, every time an ExampleDocument is inserted, the title field will have some text appended to it. Similarly any time a field with the ExampleObject type exists on a document that was inserted, the subtitle field on that object will have a string appended to it.
connector.sync(({ models }) => { models.ExampleDocument.insert({ id: `1`, title: `A title: `, exampleObjectField: { subtitle: `A subtitle: `, }, });});This data will be stored in the database as follows:
{ "id": "1", "title": "A title: testing visitors", "exampleObjectField": { "subtitle": "A subtitle: testing nested visitor" }}If you implement visitor functions for your document, object, enum, and union definitions, you can avoid writing recursive normalization code when inserting data into Connect. This is an important performance enhancement, as the Netlify SDK also recursively normalizes your data. Using visitors will prevent the system from needing to recurse on the same CMS data multiple times.
Visitor context
If you need to pass some data down to each nested visitor in your models, you can use visitor context. Visitor context is a value which can be set in one visitor and then accessed in a child visitor.
A common use-case for visitor context is for passing the locale of a document down to be used in field values of that document.
In the following example, the locale of each document is added to the id so that documents can only link to other documents in the same locale.
define.document({  name: `Page`,  visitor: (document, info) => {    info.setVisitorContext({      locale: document.locale,    });
    // here any Page document that's inserted will have its locale prepended to its id.    document.id = document.locale + document.id;
    return document;  },  fields: {    locale: {      type: `String`,      required: true,    },    relatedPage: {      type: `Page`,      visitor: (relatedPageId, info) => {        // here any "relatedPage" field id will have the locale from visitor context prepended to the relationship id        return info.visitorContext.locale + relatedPageId;      },    },  },});
Visitor context can be used to pass any data down from any object or document model to any nested field at any depth.
Concurrently fetch data
In the above examples, documents for each model type are fetched in series:
for (const model of models) {  const cmsNodes = await fetchCMSData(model.name);
  model.insert(cmsNodes);}
Fetching in series will work in a real-world connector but you’ll lose out on the benefits of JavaScript’s asynchronous concurrency. Instead, you can use the models.concurrent method to fetch multiple data types from your CMS concurrently:
connector.sync(async ({ models }) => {  await models.concurrent(4, async (model) => {    const cmsNodes = await fetchCMSData(model.name);
    model.insert(cmsNodes);  });});
models.concurrent() takes the number provided as the first argument and uses it to parallelize running the function passed as the second argument.
In the above example, assuming there are eight different model types defined, concurrent calls the function on the first four model types all at the same time. It then waits for the returned promises to resolve before calling the function again with a new model type each time a concurrent callback function resolves.
This can help you avoid hitting rate limits or overwhelming low powered servers, and it’s a simple way to fetch more than one model at a time.
Inspect model definitions while creating documents
You may need to check the types of model fields while fetching and inserting data. You can achieve this by checking the fields property on each model object.
connector.sync(({ models }) => { for (const model of models) { model.insert({ id: `1`, // this is a contrived example to illustrate the point that you can introspect your model title: model.fields.title.is.scalar ? `HI` : model.fields.title.is.document ? `2` : undefined, }); }});This is useful for dynamically building your schema and then dynamically determining how to fetch and insert data into each model. Refer to the TypeScript type for model.fields in your IDE to review the available data:
type Fields = {  [fieldName: string]: Field;};
type Field = {  name: string;  typeName: string;  fields?: Fields;  required: boolean;  list: boolean | `required`;  is: {    document: boolean;    object: boolean;    union: boolean;    scalar: boolean;  };};
Note that model.fields returned here may include fields that have additional fields within them. You must be careful when writing recursive code. A self-referencing field will have its own definition available infinitely deep, for example model.fields.relatedPost.fields.relatedPost.fields.relatedPost.fields.relatedPost.
Accept webhook bodies while syncing data
If your data source relies on sending information to your connector through a webhook body, you can access the body in the first argument passed to connector.sync(fn):
connector.sync(async ({ webhookBody }) => { // webhook body is a JSON object here with the data from the POST request});To simulate sending a webhook body in local development, send a POST request with a JSON object as the body to http://localhost:8000/__refresh.
Build a dynamic connector
The above documentation outlines how to develop connectors that sync data from a source, cache the data in the data layer’s database in Netlify Connect, and then serve the data from the cache while it’s available — you can think of these as static connectors.
But, there are some cases where you may need to develop a connector that allows Netlify to access data directly from the source every time. For example, you may need a dynamic connector to support the following scenarios:
- The data source is updated frequently and you need results in close to real time, such as financial data
- You need to access data from a pre-existing API (GraphQL/OpenAPI/REST)
- You need to use a database as a source
To build a dynamic connector, use the proxySchema method.
You can use connector.proxySchema(fn) in place of connector.model(fn) and connector.sync(fn) to have a dynamic-only connector, or you can include all of these methods and build a connector that supports a data source that is both static and dynamic.
Specify a GraphQL schema with proxySchema
Use the connector.proxySchema() method to define and build a GraphQL schema using @graphql-tools modules.
When Netlify generates the GraphQL schema for your data source, the schema that proxySchema returns will be combined with the schema generated from the connector’s model method, if one exists. The combining process is also known as schema stitching.
There are two steps:
- Define type definitions using GraphQL SDL
- Define the resolvers
Here is a snippet of an example connector that uses proxySchema to generate a GraphQL schema:
import { makeExecutableSchema } from "@graphql-tools/schema";import { stitchSchemas } from "@graphql-tools/stitch";import { buildHTTPExecutor } from "@graphql-tools/executor-http";import { schemaFromExecutor, RenameTypes } from "@graphql-tools/wrap";
// Connecting an existing GraphQL APIasync function getRemoteGraphQLSchema({ typePrefix, uri }) {  const remoteExecutor = buildHTTPExecutor({    endpoint: uri,  });
  const schema = {    schema: await schemaFromExecutor(remoteExecutor),    executor: remoteExecutor,    transforms: [new RenameTypes((name) => `${typePrefix}${name}`)],  };
  return schema;}
// Leverage an existing REST APIasync function getSchemaFromCustomRestAPI({  typePrefix,  apiClient,}: {  typePrefix: string;  apiClient: BreweryApiClient;}) {  const typeDefs = `    enum BreweryType {      micro      large      brewpub      closed      proprietor      contract    }
    type Brewery {      id: ID      name: String      brewery_type: BreweryType      address_1: String      address_2: String      address_3: String      city: String      state_province: String      postal_code: String      country: String      longitude: String      latitude: String      phone: String      website_url: String      state: String      street: String    }
    type Query {      breweryFromOrigin(id: ID): Brewery      randomBreweryFromOrigin(size: Int): [Brewery]      breweriesFromOrigin(by_type: BreweryType, by_ids: [String], by_name: String, by_postal: String, by_city: String): [Brewery]    }  `;
  const resolvers = {    Query: {      breweryFromOrigin: async (_, { id }) => {        return apiClient.breweryById(id);      },      randomBreweryFromOrigin: async (_, { size }) => {        return apiClient.randomBrewery(size);      },      breweriesFromOrigin: async (        _,        { by_type, by_ids, by_name, by_postal, by_city }      ) => {        return apiClient.getBreweries({          by_type,          by_ids,          by_name,          by_postal,          by_city,        });      },    },  };
  return {    transforms: [new RenameTypes((name) => `${typePrefix}Dynamic${name}`)],    schema: makeExecutableSchema({      typeDefs,      resolvers,    }),  };}
connector.proxySchema(async ({ typePrefix, state }) => {  const swapiSchema = await getRemoteGraphQLSchema({    typePrefix,    uri: `https://swapi-graphql.netlify.app/.netlify/functions/index`,  });
  const brewerySchema = await getSchemaFromCustomRestAPI({    typePrefix,    apiClient: state.client,  });
  return stitchSchemas({    subschemas: [swapiSchema, brewerySchema],  });});
This connector uses proxySchema to combine a schema from an existing GraphQL API and a schema from a custom REST API. The stitchSchemas function is used to combine the schemas.
For more details and the full example, refer to this combined static and dynamic connector example repository.
Specify configuration options for the Netlify UI
Your connector must define the configuration options that Netlify should expose in the Netlify UI. These options automatically populate the form fields that a Netlify Connect user will complete to use your data integration and add an instance of your data source type to their data layer.
For example, you may want the Netlify Connect user to enter the ID and API key for their CMS instance. You can use these options to request other dynamic or sensitive pieces of data that should be kept out of your integration code.
The configuration options are made available to the other Netlify Connector APIs so that you can use the values in your connector. The options are available as the second argument to connector.model(fn) and connector.sync(fn).
connector.model(async ({ define }, configOptions) => {  const cmsSchema = await fetchSchema(configOptions.url, configOptions.apiToken);  // ...});
connector.sync(async ({ models }, configOptions) => {  // ...});
All data sources include a type prefix field in the Netlify UI
By default, all data sources in Netlify Connect include a Type prefix configuration field in the
Netlify UI — including those that use a data integration. It is a required field when a user wants to
connect one data layer to multiple data sources of the same type, such as two instances of your
custom data source. When Netlify generates the GraphQL schema for the data layer, it will add the
prefix to all GraphQL types from that data source.
To define configuration options for your connector, use defineOptions() to defined and return a zod.object() that includes a property for each configuration option. Learn more about the Zod schema.
Option properties
For each option that you configure on the zod.object(), you must include the type and the label metadata property. All other properties are optional.
Netlify supports the following properties:
- option type: defined using the related zod method, for example
zod.string(). We currently support objects, strings, numbers, and boolean values. Arrays are not supported. optional(): (optional) marks the field as optionalmeta(): defines metadata to customize the UI copy that will appear in the Netlify UI. Accepts an object with the following properties:label: the label to use for the form fieldhelpText: (optional) the help text to display with the form field that helps users understand what value to entersecret: (optional) set this to true to mark a field as secret and Netlify will mask the user’s value in the Netlify UI
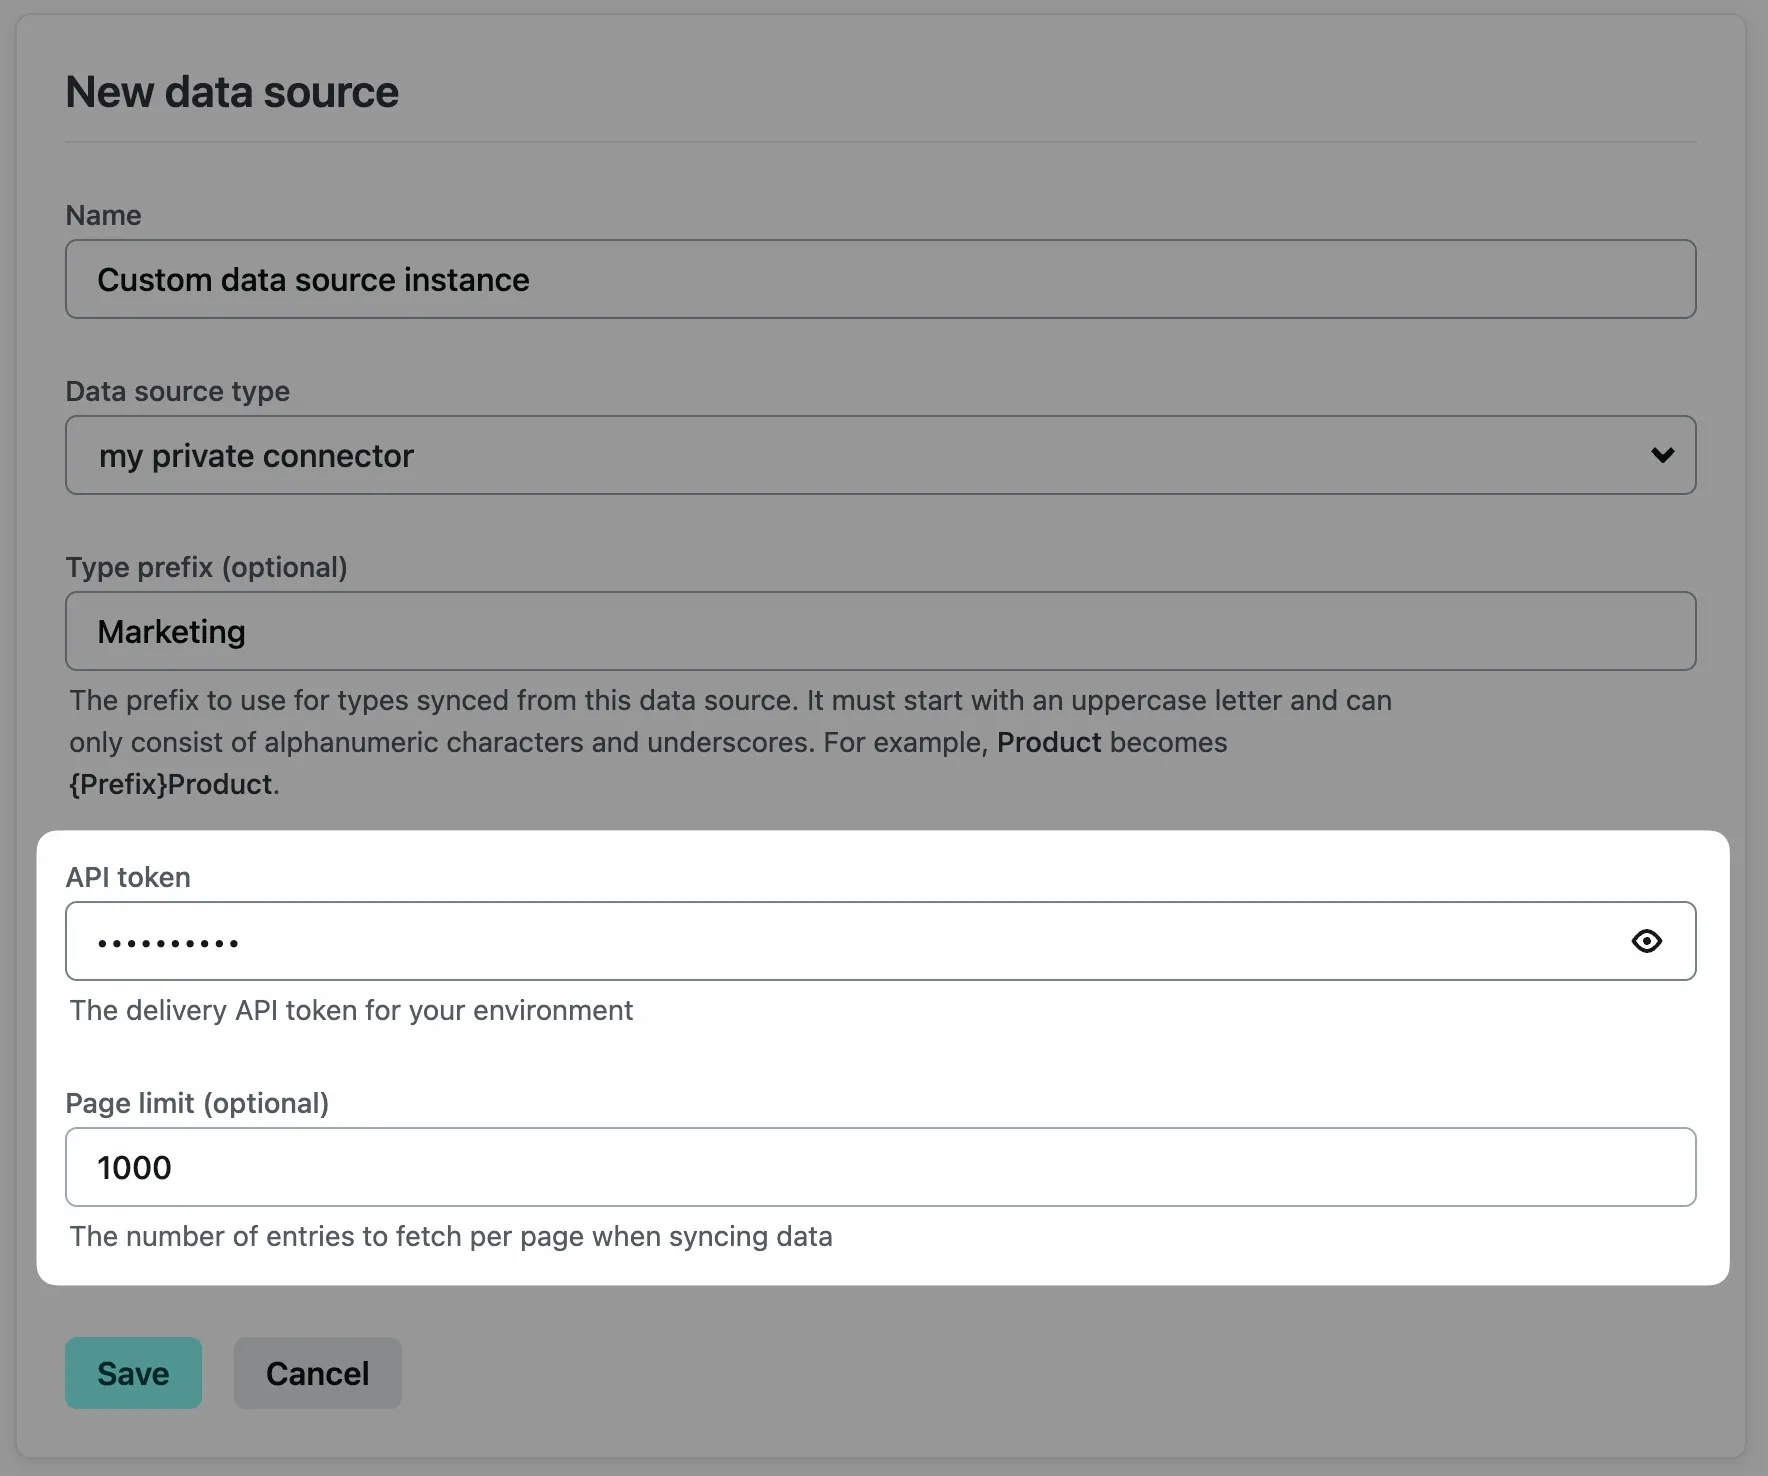
For example, to define a required API token field that masks the user’s value and an optional Page limit field, you would do the following:
connector.defineOptions(({ zod }) => { return zod.object({ apiToken: zod.string().meta({ label: "API token", helpText: "The delivery API token for your environment", secret: true, }), pageLimit: zod.string().optional().meta({ label: "Page limit", helpText: "The number of entries to fetch per page when syncing data", }), });});Once you publish your data integration, these options will appear in Netlify Connect as configuration fields for users to complete. As a user enters a value into the field marked as secret, Netlify masks the value:
You also have the option to pass these values in manually while working on local development, as outlined in the following section.
Set configuration values for local development
During local development, you can set values for the connector’s configuration options as if a user had entered them in the Netlify UI.
To do this, add the localDevOptions property to the object that you pass to the addConnector method, and add a value for each configuration option on the localDevOptions object.
For example:
import { NetlifyIntegration } from "@netlify/sdk";
const integration = new NetlifyIntegration();
const connector = integration.addConnector({  typePrefix: "Example",  // localDevOptions emulates a user setting configuration  // options in the Netlify UI. localDevOptions only runs  // during local development.  localDevOptions: {    exampleConfigOption: "Hello!",  },});
connector.defineOptions(({ zod }) => {  return zod.object({    exampleConfigOption: zod.string().meta({      label: "What should the greeting be?",    }),  });});
export { integration };
Customize the enablement flow
As outlined in the enablement flow doc, integrations have access to an onEnable method that runs after a user enables a published integration in the Netlify UI. You can add logic to customize the flow as needed.
integration.onEnable(async (_, { teamId, siteId, client }) => {  // add any custom logic here
  return {    statusCode: 200,  };});