Get started with Connectors
This page will help you get started with creating a data integration using Connectors. It describes how to install and generate the boilerplate code, how to add a Connectors component, and how to start development.
Prerequisites
Windows users should run the Netlify SDK through WSL 2
Support for using the Netlify SDK on Windows is currently only available through WSL 2.
- Node.js 18 or later
- Netlify CLI
- Netlify SDK utility tools (required for Connectors only)
- TypeScript
Install
To get started, run the following command to create a new integration:
pnpm create @netlify/sdk@latestyarn create @netlify/sdknpm create @netlify/sdk@latestThen, follow the prompts to add the boilerplate for a Connectors component.
The Netlify SDK will scaffold the basic structure needed for your connector and output these required files:
The following sections provide detail on the boilerplate code for each file and the required configuration in each.
package.json
The automatically generated package.json includes the following required fields:
name: the name of your integration.main: the entry file for your integration. This file is where you add a Connectors component to your integration and specify how it should work.type: the package type, which must always bemodule.
It also automatically includes the @netlify/sdk dependency.
For example:
{ "name": "example-integration-with-connector", "version": "0.0.1", "dependencies": { "@netlify/sdk": "^1.0.0" }, "main": "src/index.ts", "type": "module"}src/index.ts
The Netlify SDK automatically generates a src/index.ts file and specifies it as the main entry file in the package.json. The SDK uses this file as the entry point to load and bundle your integration.
If you update the file name, you must ensure that you update the main field of the package.json. For example, the filename may be src/entry.ts, and the package.json would include it as "main": "src/entry.ts".
The main entry file is where you include all of the code that configures your integration, including the connector and its functionality. The file must export a valid NetlifyIntegration object.
import { NetlifyIntegration } from "@netlify/sdk";
// Creates an integrationconst integration = new NetlifyIntegration();
// The code to create a connector and to specify// the functionality for your connector goes here
export { integration };
The following sections go over how to create a connector, start developing the code for it, and then run it locally. You can copy the examples as a quick way to get started and test the functionality.
Create a connector
Now that you have the boilerplate code, the first step is to add a Connectors component to your integration by calling addConnector().
For example, add the following code to the generated src/index.ts file:
import { NetlifyIntegration } from "@netlify/sdk";
const integration = new NetlifyIntegration();
// Adds a Connectors component to the integrationconst connector = integration.addConnector({  typePrefix: "Example",});
export { integration };
Develop your connector
Once you add a Connectors component to your integration, you need to define a data model on the connector and specify how to handle data updates on initial and subsequent syncs.
For example, add the following code to the generated src/index.ts file:
import { NetlifyIntegration } from "@netlify/sdk";
const integration = new NetlifyIntegration();
const connector = integration.addConnector({  typePrefix: "Example",});
// Use the Netlify Connector API on the `connector` object// to define a model with a single document model on itconnector.model(async ({ define }) => {  define.document({    name: "Post",    fields: {      title: {        type: "String",        required: true,      },    },  });});
// Use the Netlify Connector API to configure how data should// be handled on initial and subsequent syncs. In this example,// we’re passing in sample data in line.connector.sync(async ({ models, isInitialSync }) => {  switch (true) {    case isInitialSync: {      models.Post.insert([        {          id: "1",          title: "This is my example post",        },      ]);      break;    }    case !isInitialSync: {      models.Post.insert([        {          id: "1",          title: "This is my example post",        },      ]);    }  }});
// export the valid integration objectexport { integration };
Along with the above code, you will also need to define the configuration options to display in the Netlify UI.
To learn more about how to configure your connector, review the develop a connector doc and the Netlify Connector APIs reference documentation.
Run locally
With the Netlify SDK utility tools, you can run your integration locally as you develop. To globally install the tools, run the following:
pnpm install -g @netlify/sdkyarn global add @netlify/sdknpm install -g @netlify/sdkOnce you have the tools installed, you will need to run the following command:
pnpm run devyarn devnpm run devThis command bundles your integration code and starts a local GraphQL server at http://localhost:8000/__graphql. Visit this URL in your browser to load the graphiql UI and test queries locally.
Make sure your project has a dev script
When you use the SDK’s guided set-up flow to create an integration, we automatically add a script to your project that runs the netlify-integration dev command. If you skipped the guided set-up flow, make sure you manually update your package.json to include "dev": "netlify-integration dev -c"
If you defined configuration options for your connector, you may need to set values before you can use the integration locally. Learn how to set configuration values for local development.
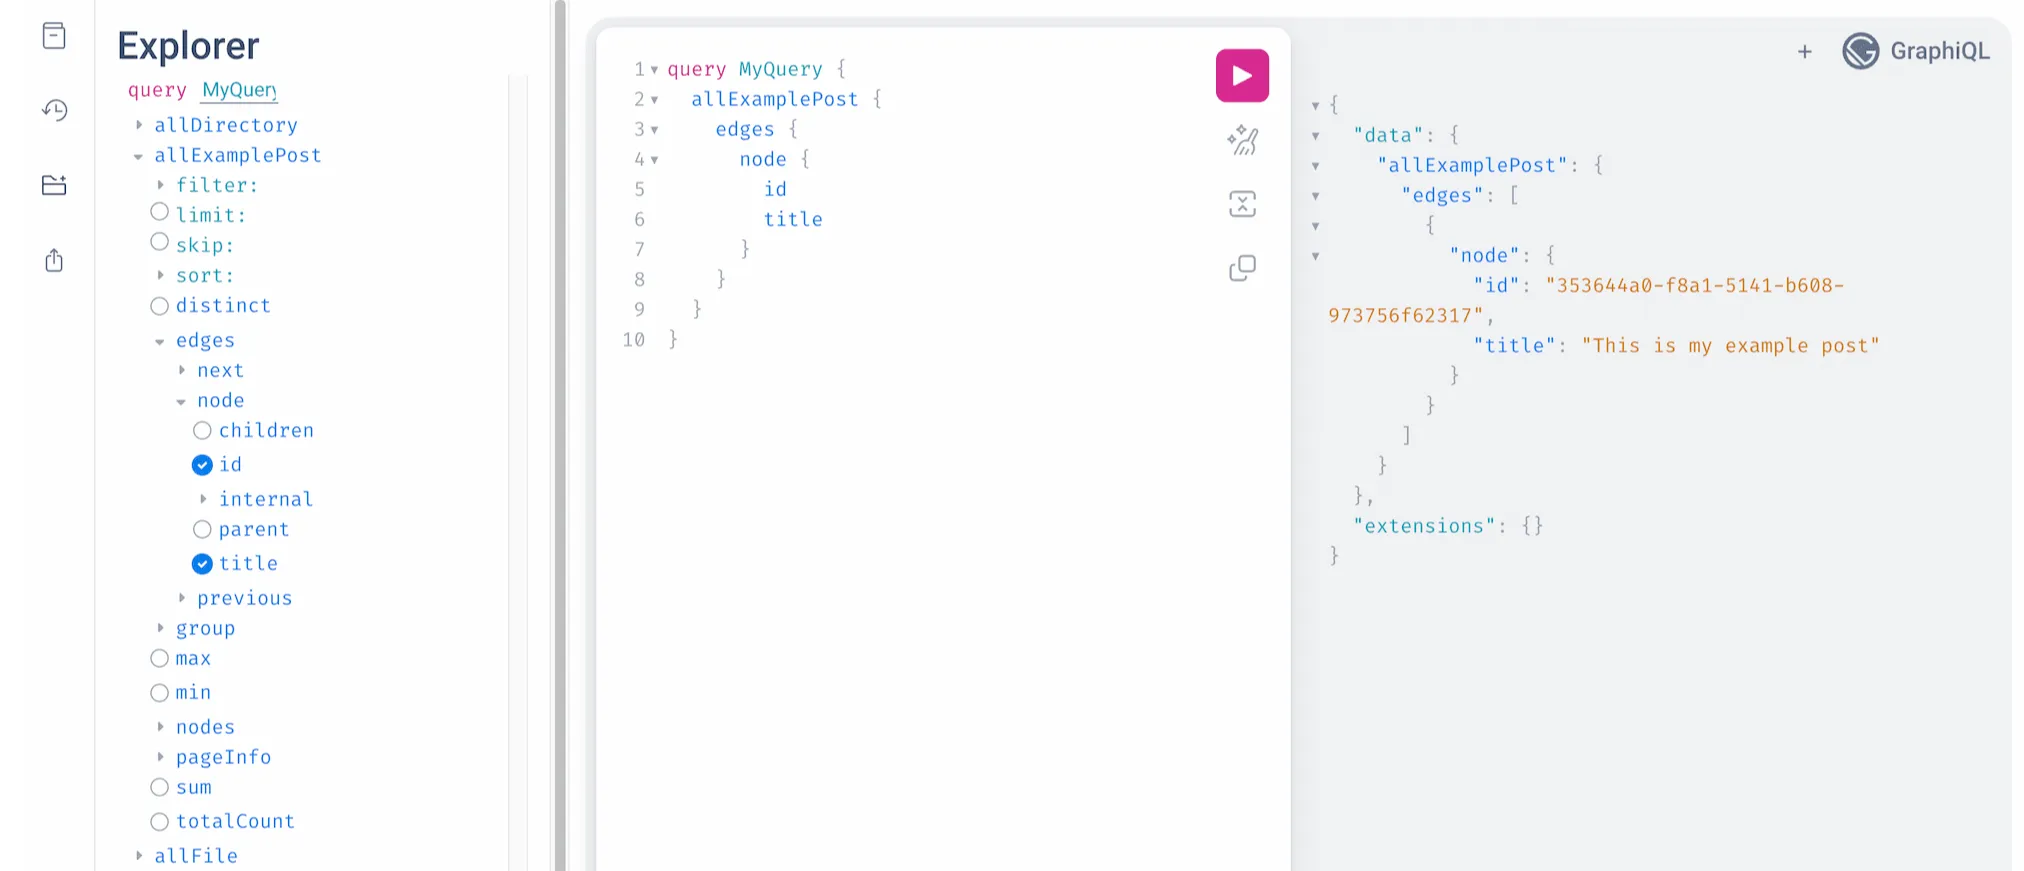
For example, if you start local development with the example code that’s documented in the develop your connector section above, you can run a query for the id and title of allExamplePost in the graphiql UI and the local server will return the data we created. Note that Netlify makes the ID globally unique.
When you save your code, the local development server will automatically restart and pick up your changes. If you use Node debuggers and the process pauses on a breakpoint, saving your code will kill the debugger and start a new one.
Next steps
Once you have generated the boilerplate code, review the develop a connector documentation to learn more about the workflow and how to use the Netlify Connector APIs to customize your integration. As you develop, reference our documentation on how to build and debug and test your code.
Once you’re ready, learn how to publish your integration.